How We Built Our Campervan Shower and Toilet
Hey there, campervan fans! Ever dream of hitting the road with your very own campervan, complete with a cool shower and toilet? But, are you a bit unsure about how to make that dream come true? Well, you’ve found the perfect place to start! In this blog, we’re excited to share our very own adventure of building a our Shower and Toilet. It’s a story about turning a regular van into our dream home on wheels.
We started just like you – with a big idea but not sure how to begin. We’ve lived in our campervan for over two years now, and it’s been amazing! Before we dived into building our van, we tried out lots of different camper vans to figure out what we really needed. And let’s just say, we learned a whole lot!
We’re here to guide you step by step, from choosing the right materials to fitting everything neatly into your van. Let’s make your campervan as comfy and cool as it can be, starting with the perfect little bathroom.

- Should I Have a Shower in My Camper Van?
- Where to Install a Van Bathroom
- Can You Put a Bathroom in a Camper Van?
- What Are The AlternativeShower Options?
- Our Van Shower Location
- Camper Van Bathroom Kits
- DIY Camper Shower
- How Do Campervan Showers Work?
- CAMPERVAN PLUMBING AND SHOWER FITTINGS
- Best Showerhead For a Van
- CAMPERVAN HOT WATER SYSTEM
- Camper Toilet Shower Combo
- What is the Smallest Camper Van With a Shower and Toilet?
- How Much Does it Cost to Convert a Van With a Shower?
- Would I Build a Sprinter Van Bathroom Again?
Should I Have a Shower in My Camper Van?
Before making the jump into our own van build, we hired many campervans, and we strongly recommend you do the same before committing. None of these vans had a van bathroom. However, they had a portable toilet, which we did not use because of the potential mess and smell when cleaning.
As a result, we found ourselves searching for toilets that were in good condition. We would often pay for a campground or gym membership to have a nice shower every couple of days. All in all, it wasn’t that big of a deal; however, we prefer to camp at more off-the-grid spots for long periods, so there wasn’t a solution close by on most trips.
The most annoying part for me is that I have a small bladder. My body likes to let me know I need to wee around 2 am – 3 am every night. I would be okay with just opening the side slider door, making sure no one was around and doing the business.
Dani, on the other hand, wouldn’t have this luxury. If she had to wee in the middle of the night, she would have to put clothes and shoes on, walk in the dark and pop a squat. Forget about it if it’s raining. She even purchased a “she wee”, which helped a lot, but it wasn’t the ideal solution.
So one thing was evident when we started designing our van conversion – we wanted to fit in a composting toilet and a shower.
Where to Install a Van Bathroom
The next question we asked ourselves was: “Where do we fit them?” We were not 100% sure if we wanted to have an outdoor or an internal shower in our camper van conversion. As you will see below, we decided on an internal bathroom. We were able to fit it into our floor plan.
The thought process when making this decision was that we would be travelling all year round. An outdoor shower would probably restrict us depending on the weather and where we stay.
Can You Put a Bathroom in a Camper Van?
Of course, whether it’s inside your van or outside. The best position is inside the van as you can control the temperature and comfort of privacy. Still, if you have a small van, then maybe an outdoor shower could be the only solution for some people.
When deciding on a bathroom place in our van conversion, we had to consider our main living areas. We knew we wanted the kitchen and living space to be in the middle of the van and close to the sliding door. That meant our bathroom had to go near our bed.

What Are The AlternativeShower Options?
We looked at all the alternatives for showering options. A roof-mounted external shower was one of them, but it would have to be manually filled with a hose every time we wanted to use it. That seemed like too much effort and inconvenience compared to simply having an internal toilet/shower cubicle in our van conversion.
We will explain the benefits of each below:
Portable Hot Water Systems
Some people like to rough it when they camp. Instead of having warm water for a shower, you get the water heated by fire or other fuel source and then cooled before consumption (think camping in the great outdoors). This type doesn’t require electricity; all your needs are already here! For pressurized showers with high-quality equipment such as valves and hoses/valve stems plus any temperature control components.
Pros:
- The water heats up quickly under pressure.
- Temperature controls for added comfort.
- There are several different versions to choose from.
Cons:
- Large and heavy
- You’ll need a power source to get started.
- It can be expensive compared to many other options.
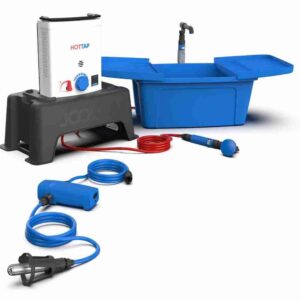
Our pick is the Joolca HOTTAP V2 Hot Water System
The Joolca HOTTAP V2 is a portable hot water system designed for outdoor use, making it an ideal choice for camping, off-grid living, or as an outdoor shower solution. Here’s a detailed review based on the information available on their website:
Key Features:
- Portability: The HOTTAP V2 is highly portable, making it suitable for various outdoor settings. Its compact size allows for easy transportation and setup.
- Ease of Use: The system is designed for simplicity, with a quick setup process. It features Quick Connect water in/out and gas connections, ensuring hassle-free operation.
- Temperature Control: Users have full control over the water temperature, allowing for a comfortable and customizable shower experience.
- One-Touch Operation: The system starts with a simple flick of a switch, providing immediate hot water flow.
- Versatile Use: The modular showerhead can be used handheld or as a ceiling-mounted shower. It also includes a faucet attachment for sink use, enhancing its versatility.
- Water Source Flexibility: The HOTTAP can be connected to a jerry can or directly to a natural water source like a creek or lake, thanks to its sturdy two-stage water filter.
- Powerful Pump: The pump can self-prime to 1.8m and push water up to 30m, making it suitable for various campsite setups. It’s also weather-resistant (rated to IPX3).
- Community Support: Joolca has an active online community where users share ideas and experiences, providing additional support and inspiration for potential users.
User Reviews:
Users have praised the Joolca HOTTAP V2 for its reliability and performance in various conditions. It’s been noted for its ease of use, effective heating, and versatility in different camping and outdoor scenarios.
The Joolca HOTTAP V2 stands out for its portability, ease of use, and versatility, making it an excellent choice for outdoor enthusiasts who need a reliable hot water solution. Its ability to tap into different water sources and the strong community support add to its appeal. The positive user reviews further attest to its quality and functionality in real-world conditions.
Glind Heat Exchangers
You might also use your van’s engine to heat water for this clever camping shower system. You may enjoy pressurized hot water by installing a heat exchanger beneath the bonnet, utilizing a pump and connecting hoses to your car.
Pros:
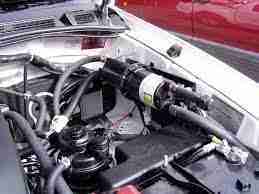
- It works on all types of vehicles.
- You don’t need any additional power sources after this.
- It is compact and can be picked up at any time.
Cons:
- It’s a little more challenging to install than other ones on the market, and you’ll need to hire a professional mechanic.
- Expensive
Our pick: The Glind Heat Exchanger
Pressure Showers
No batteries or electricity is required for these showers, thanks to a pressure hose. Fill your container with water and wait 20 seconds to enjoy the power of a typical household tap for four whole minutes.
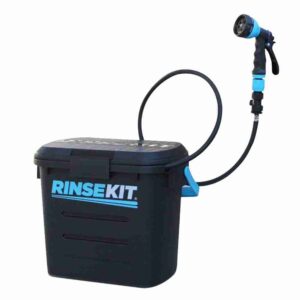
Pros:
- It’s simple to get started and takes less than a minute.
- It fits the name, as it offers excellent water pressure.
Cons:
- It doesn’t hold heat well
Our pick: The RinseKit
Solar Showers
Solar showers come in a variety of shapes and sizes, warming the water generated by the sun. This type usually consists of a black PVC bag designed to be hung, absorbing the day’s sunshine. Many have detachable hose showerheads,
and some are compatible with 12v water pumps.
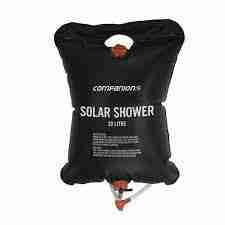
Pros:
- Low-cost
- Simple to use
- There’s a lot of different things to pick from.
- Eco friendly
Cons:
- It uses direct sunshine and heat to warm the water.
- Depending on where you use it, water may become dangerously hot.
- Water pressure can be low without a pump, as it is delivered by gravity.
- Water capacity for larger groups may be restricted.
Our pick: Companion 20L Premium Solar Shower
Compact Camping Showers
You may enjoy minimal van life and for little money with these simple showers. Fill the heat-resistant bag with water and seal it shut. Have the showerhead positioned at the base of the bag, which hangs from a branch or roof racks. When you’ve finished, fold it down to pocket-size and
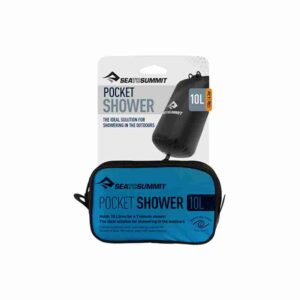
Pros:
- Light and simple
- The tiny size of the bag makes it simple to store.
- It’s pretty affordable.
Cons:
- Coldwater
Our pick: Sea to Summit Pocket Shower
Our Van Shower Location
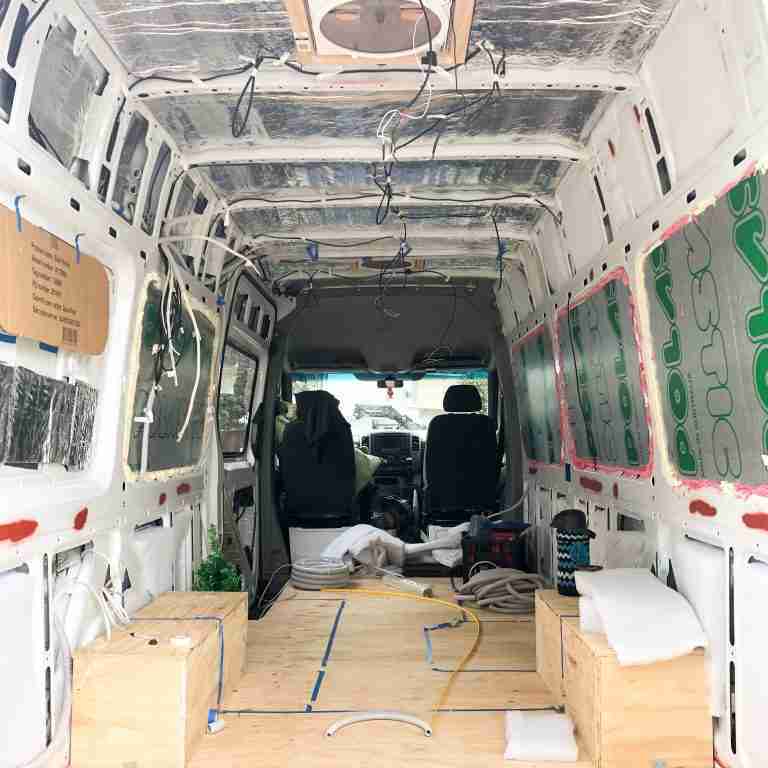
When planning your bathroom design, the first thing to figure out is where to put it. In our van build, we decided that a full-size bed and a shower were the two most essential areas, and everything else would be built around these.
During our research, many people installed their showers behind the driver’s seat. Still, we weren’t keen on this idea because we wanted to have a bench seat for relaxing/working with a view out the sliding door.
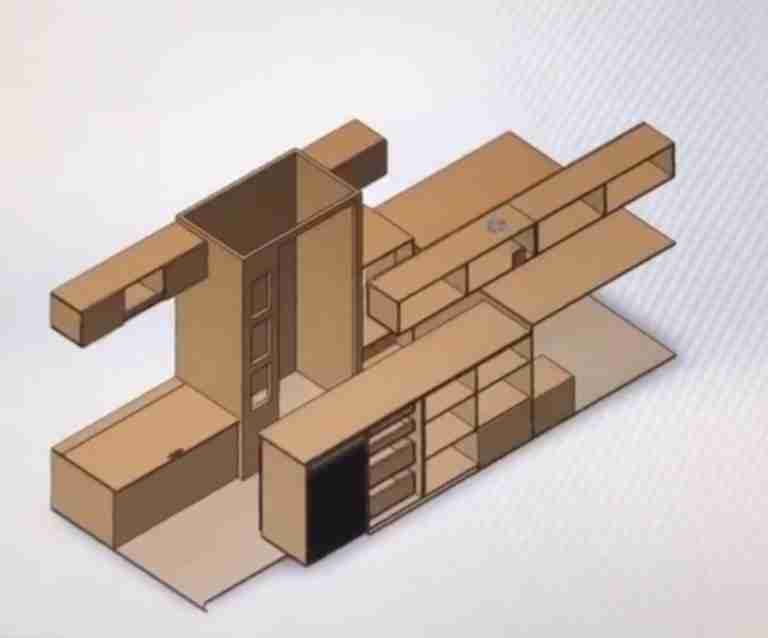
We decided on having the shower right next to the bed. After making this decision, we quickly ran into a problem. The rear wheel arches would be in the way of the shower. This meant we had to move the shower 500mm to the front of the van and add a cabinet next to the bed instead, as you can see from the drawing above.
Picking the final location will vary depending on your van size and layout. We recommend putting tape on the floor to help visualize your layout idea.
Camper Van Bathroom Kits
Our original plan was to purchase a premade fibreglass mould which was designed for our Mercedes sprinter van. This option would still require a frame to be built around it. Still, it should not require any additional material for the internal walls, waterproofing and no joins.
The con of premade moulds is that they are expensive, and you are set to the available sizes. Although we were initially keen on this option, it quickly became apparent that this was not what we wanted.
We researched many options for bathroom kits and found they varied in price, quality and ease of installation. We found some cheaper kits with plastic moulds, but there wasn’t enough information on the durability of these kits. We also found kits that use fibreglass moulds which are much more expensive. We couldn’t justify spending $1500+ on a bathroom kit when we could make our own much cheaper.
DIY Camper Shower
We decided to tackle the bathroom from scratch, which saved us some money, but it did add a few more weekends to the van conversion. This did allow us to build the shower where we wanted and to the curves of the van. Another option is to buy a pre made fibreglass mould
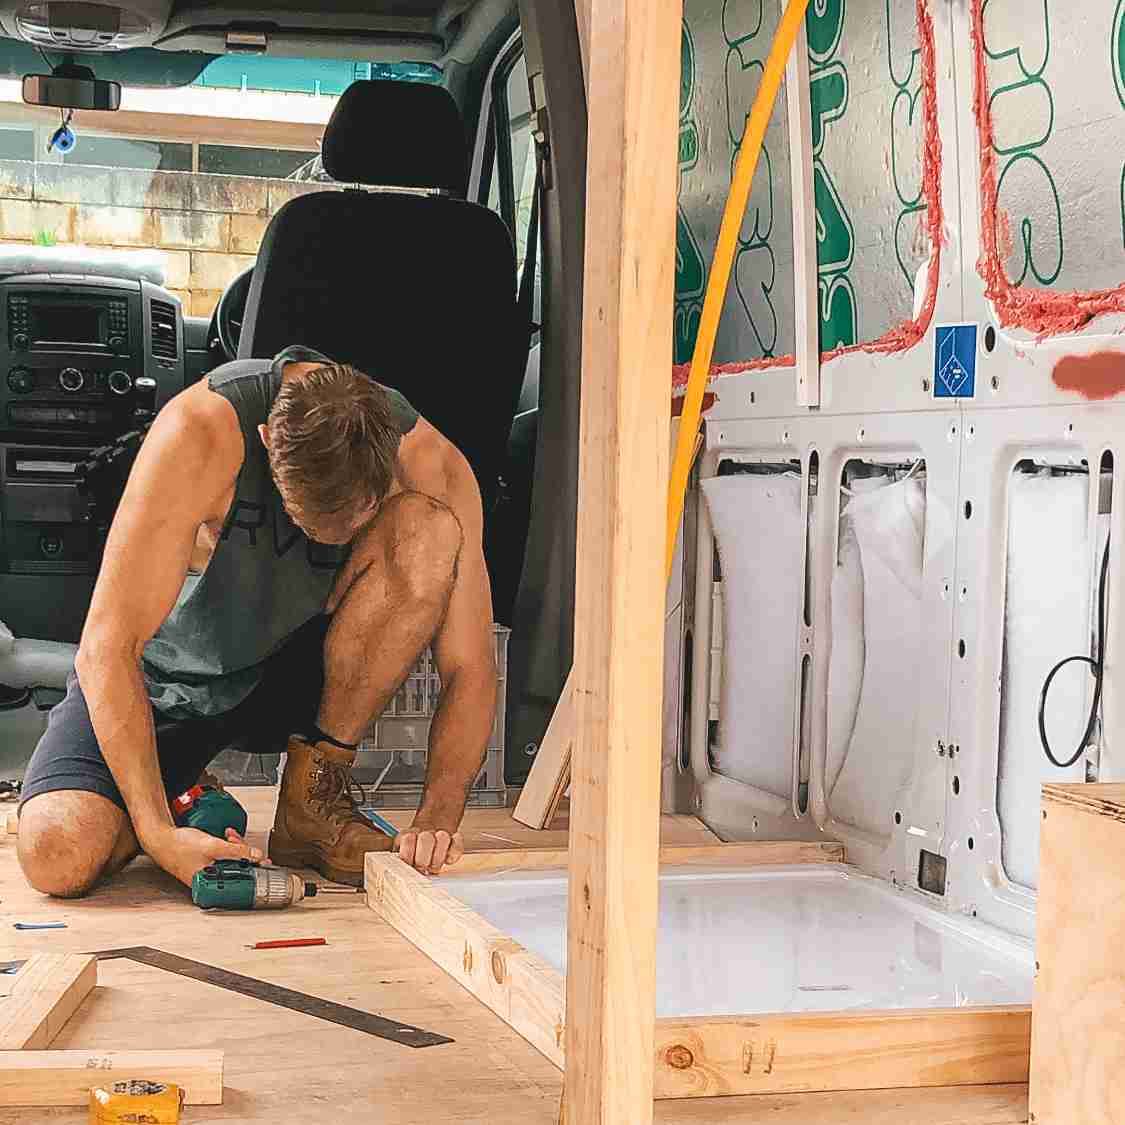
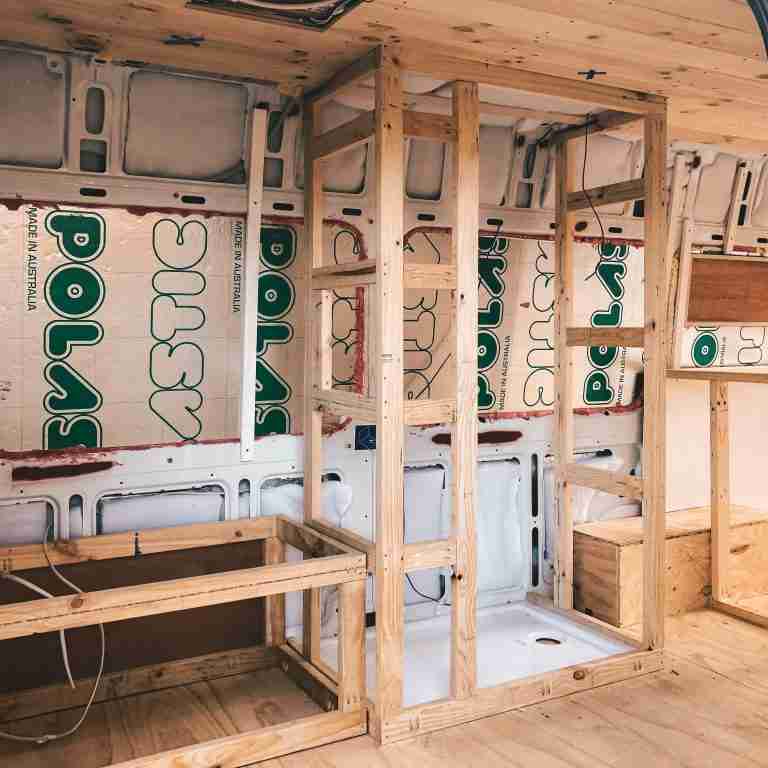
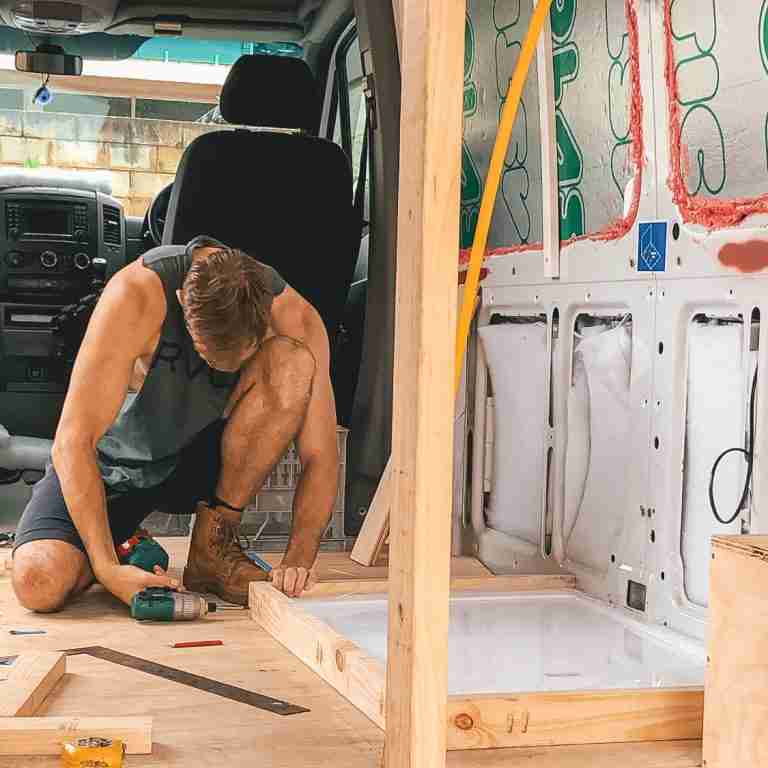
For us, the most challenging part of the whole shower build was the framing for the shower. Why was it so difficult? You have to get the frame squared with the van floor for the rest of the shower to line up straight and squared. This took a few tries, and we quickly found out that nothing in the van is straight, and everything takes longer than you think.
1) Premade Shower Tray
We purchased a premade shower pan that was big enough to allow for the composting toilet and the caravan shower unit. We did need to trim each side of the shower tray to help get the framing timber closer to the shower tray. This got us extra living space. Every inch counts in a van build.
2) Framing
We used two by four framing timber to give us the shape of the shower. We started from the bottom around the shower pan and worked our way up to the roof. As nothing is straight, it wasn’t easy to get it nice and square, and It took us a few tries. This is not the end of the world; you need to be patient.
The shower tray was installed into the frame, and this was then sealed with silicone.
The framing is the most challenging part of building a shower in your van, so it pays to get right and take your time. There are plenty of tutorials on how to make showers for campers out there. Still, they don’t always go into detail about all aspects involved when building one for yourself.
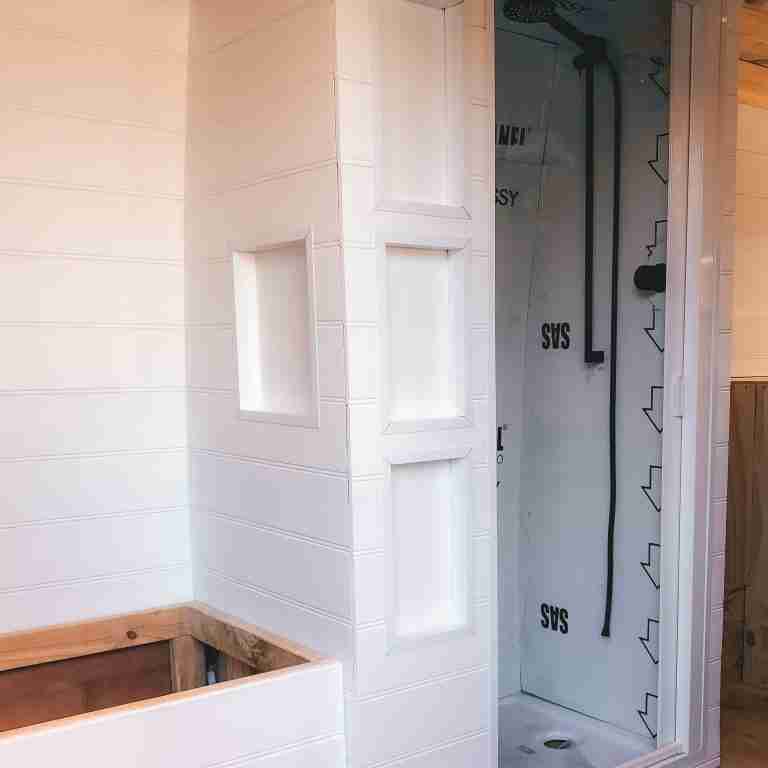
3) Waterproofing
Now we had the bathroom frame and installed the shower pan. It was time to work out how to waterproof the shower walls. We spend hours researching the best solution to help with no water leak issues.
We started to go down the road of waterproofing as you would for a house wet bath area. Still, we began to notice a few people using ACP or Aluminium composite panels to finish the internal walls in their builds. This product is used a lot in signage and for toy trailers and is very lightweight.
Okay, done, ACP it is. We have our internal wall material picked. Now we need to work out how to mount it. The solution was to install a 4mm marine ply to the shower wall. This allowed for a clean, flat surface to glue the ACP to. ACP is super easy to work with; we just used a jigsaw with a metal cutting blade and cut the pieces to the correct shapes.
Before installing the ACP, we used 291 Sikaflex, where the marine ply met the shower pan to help reduce the risk of water seeping through. Once the ACP was cut and ready to be installed, we used super strong liquid nails to glue them to the marine ply and sealed all of the joins with a generous amount of 291 Sikaflex. We used white angled pieces to finish the 90-degree angles on the door opening to give it a tidy look and sealed it all up.
4) Shower Curtain
To finish the camper shower, we added a glideaway shower door. It easily mounts to the opening, and we pull the retractable door and lock it in place when taking a shower. A built-in wiper blade removes most of the excess soap and water when the screen retracts into the canister.
Another option would be to make your own. We saw a few examples of people using PVC with fabric on the back and magnets along the edges.
How Do Campervan Showers Work?
Those who have campers vans that are equipped with camper van bathrooms usually have a small water heater installed. The electric heaters can take around 10 minutes to warm up, but gas-powered ones seem instantaneous!
Showers work just like any other shower you might find at home. The only difference is the water supply used. Instead of using a central water supply, campervans will use a small water pump to draw the water from the freshwater tank. The wastewater will go into the grey water tank, which will need regularly checking because they’re generally being filled from other sources used during cooking/baking.

CAMPERVAN PLUMBING AND SHOWER FITTINGS
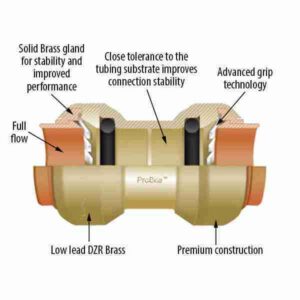
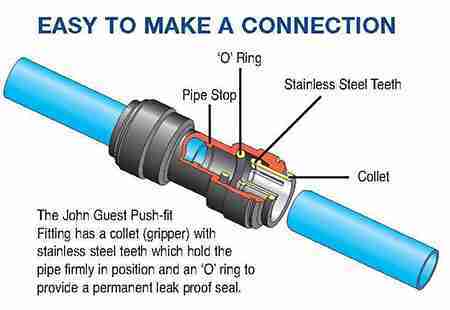
We had two choices on which plumbing fittings to choose; it was Sharkbite or John Guest. We went with John Guest for the plumbing system throughout our van. It’s a straightforward system with no additional tools needed for the installation.
Next was the shower waste, and we opted for the Hepvo trap. They are perfect for campervans as they are a dry water style trap and hardly require any room like the P trap styles. We are routing all the water under our van to our grey water waste tank.
Our shower head is on a rail which is perfect for us to lower it or make it higher at any time. The shower mixer is just a standard house mixer. As we created the frame from 2 b 4’s, it has given us a small cavity to install the plumbing pipes and to be able to mount the shower mixer into the wall.
Best Showerhead For a Van
The best showers heads for vans are going to be those that have a reduced flow of water. You know, we’re all trying our best with what little resources that we have here and these showerheads help us conserve them even more while being off-grid.
However, determining the water flow of showers is surprisingly tricky. And we’ve tried our best to avoid campervan or caravan-specific goods because they are too expensive and for the same job.
Some people are fans of the hand press option, which can be inconvenient. For example, if you want to shower, you need to hold it with one arm while using the other to wash, which is not ideal for most van lifers. It just comes down to personal preference.
CAMPERVAN HOT WATER SYSTEM
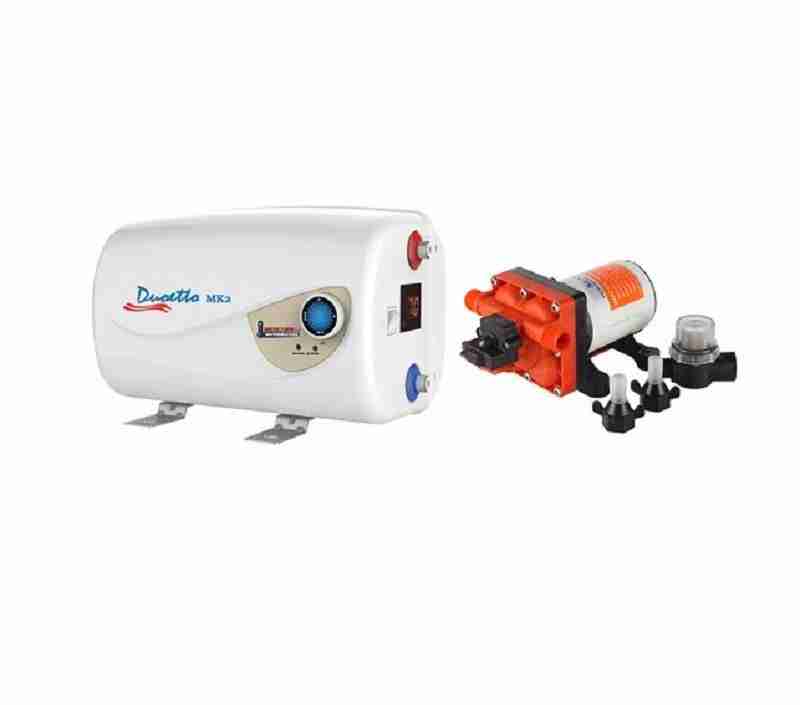
We decided early on not to have gas in our van, so the instant hot water gas heaters were out. This left us with the 12-volt water heater options. There was only one that stood out for us, and it was the duoetto mk2; it’s exactly what we wanted. It can be heated via 12v or 240V power if available. The holding tank is 10L which has been enough for one person to have a 3 to 5 min shower. However, take note of the showerhead you choose, as each one has a different water rating. Some can use more water per minute than others.
We have ours wired up to the 12v system, and it takes roughly 20 mins to get up to around 45 degrees (113 Fahrenheit). The hot water system will use about 25 amps per hr on 12 volts and 4.2 amps per hour if running it from 240v power. We had to factor this in when designing our electrical system. A good idea is to turn the heater on 20 mins before your destination. If you have a good DC to DC charger set, the car will be heating your water and not using any of our battery power.
Check out our detailed review on the Duoetto MK2
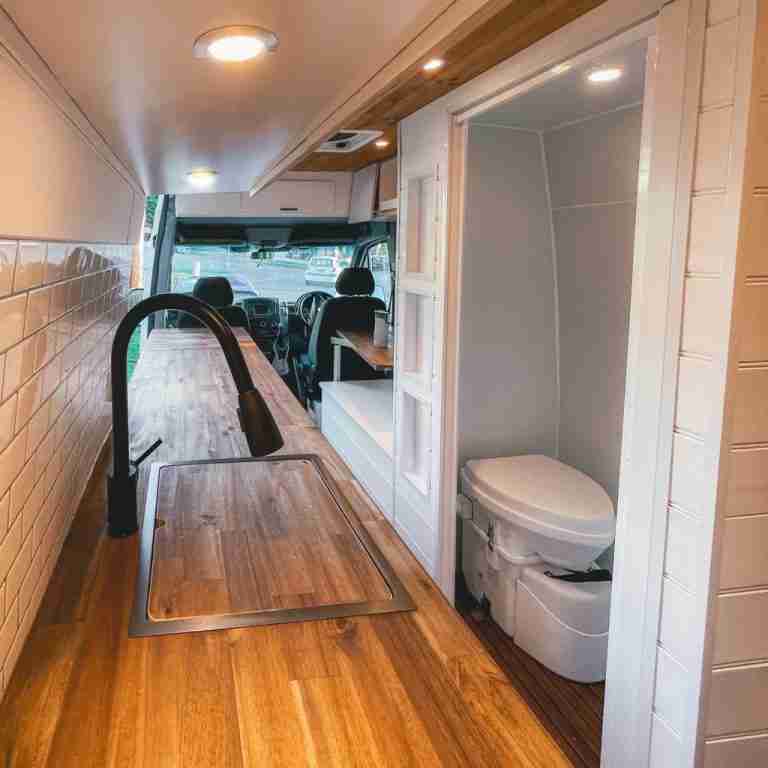
Camper Toilet Shower Combo
You will find that most people will opt for a caravan shower toilet combo in their camper vans not to have any wasted space.
The option you choose here is up to your personal preference. One, if you are looking for space-saving or two-if more natural but less convenient, then maybe opting for separate toilets would be better suited?
What is the Smallest Camper Van With a Shower and Toilet?
The smallest campervan with a wet room is generally any high roof van, for example, Mercedes Sprinter High Roof or Ford Transit.
If the van has a low roof, you will need to save space by installing the shower outside the van. an example of a low roof would be a Toyota Hiace or Hyundai iLoad
The internal dimensions will be so small to have an internal shower. However, you will be able to fit a cassette toilet or composting toilet. Most toilets can be located in a hidden bathroom to help provide more space inside the van.
How Much Does it Cost to Convert a Van With a Shower?
A good cost guide to convert a van with a shower would be in the $30,000 to $50,000 range. It could be even more if you have a professional van builder do the work.
Having a van bathroom can add a lot of cost to your van conversion. It is generally not a high priority for most people if they want a relatively low budget van build. So investing in something like this will only be up if you have the budget.
Depending on your van, it could also double or triple your power usage, which means more solar panels and batteries! It would be best if you also thought about your fresh water tank, and how much it will use.
If you want to build something like this, I recommend talking with your local campervan conversion company. They will know all the best brands and products out there for this sort of thing so they can help you find what’s right for you so you can have the amazing van of your dreams.
Would I Build a Sprinter Van Bathroom Again?
The short answer is yes. The flexibility and comfort it provides are nice to have. The shower we built was a pretty simple setup, and it is a full-featured shower that anyone can build. It wasn’t that difficult, and in fact, the most difficult parts were the initial framing and then finding the parts that I needed to finish the entire project.
Once I found the tools, parts and fittings needed, it was simple to put together. The project went together quickly, and I’m proud of how it ended up. We use it pretty much every night.
It was a challenge initially, figuring it all out and getting all the walls straight, but once we made a start, we could see the light at the end of the tunnel. It was not a simple process but worthwhile addition to our camper van.